
Are you trying to get started with food photography but have no idea what you're going to need? I'm here to help! In this post I'm sharing all of the equipment and software I use for food photography - everything from the camera to the cloud backup storage. Good quality photography gear comes with a big price tag, but I've also included some more affordable options in case you're on a budget or are trying to decide if you really want to pursue food photography!
Jump to:
Camera Gear
Camera
You don't need an expensive camera to take good photos. With how advanced smartphones are these days, it's very possible to take impressive photos with your iPhone or Android. However, if you do decide to get a digital camera, you don't have to break the bank buying one. Sure, the camera is important, but the person taking the photo determines more about the quality of the photo than the camera does!
For digital cameras, you have two options: mirrorless or DSLR. I started with a Fujifilm X-T3 mirrorless camera and it was great! Now I use a Sony a7 III, which is also mirrorless. DSLR's tend to be more popular, especially in the food niche, but they're quickly becoming outdated. I talk about it a little more in my food photography guide.
Lens
Once you have a camera, you'll need a lens. The lens you get will depend on the camera you have, as well as your style of photography. I had a 35mm lens to go with my Fujifilm camera. I'm currently using a Tamron 28-75 f/2.8 lens with my Sony. There are many different options out there and lenses can be pretty expensive, but that's because they're great quality, last a long time, and usually are interchangeable between cameras (of the same brand).
Other Camera Equipment/Accessories
Necessities
- Memory Card
- I use a 64 GB SD card. The size or quantity you get is completely up to you and how many photos you'd like to shoot before emptying your card! Another important thing to note is the writing speed (MB/s). If you're taking a lot of photos, especially in continuous mode, you're going to want one that's high-speed.
Optional
- Adapters
- If your computer doesn't have a slot for the memory card, I recommend this adapter. It also includes USB slots to hook up external hard drives as well.
- UV filter
- A UV filter adds an extra layer of protection at a low cost and shouldn't affect the quality of your photos at all. Make sure the one you get fits your lens!
- Spare battery
- Just like memory cards, having spare batteries is totally a preference. Sometimes my battery flashes red in the middle of a shoot, so I like to keep an extra charged one on hand.
- Tripod
- A lot of food photos are taken from bird's eye view. If you plan on taking photos or videos this way, you'll want a ball head tripod with an overhead arm. I use this tripod, which is a good mix between quality and affordability. If you want the best, I recommend a Manfrotto tripod.
- Sand bags
- If you're using tripods or C-stands, you'll want some sand bags to hold them down for extra stability and safety. These don't usually come with sand so you'll have to buy that separately and fill them up yourself.
- External Hard Drive
- I keep a backup of all of my photos on my external hard drive.
- Tethering equipment
- I use a long USB-C cable and Imaging Edge Desktop (for Sony) to tether.
- Camera remote
- Camera strap
Lighting
You basically have 3 options for lighting: natural, artificial continuous, or flash. I personally haven't tried flash photography yet, so I'm only going to talk about natural and continuous artificial light for now.
Natural
Natural light is the cheapest option, but you have very little control over it. You can set up your shoot near a window and angle it how you'd like, but the sky still has a mind of its own. The angle of the sun and the clouds affect the temperature and intensity of the light shining through your window. Even on mild days, there's going to be a lot of changes happening during a photoshoot. You'll have to constantly adjust your camera settings, and your photos will vary in white balance, contrast, etc. when you go to edit them. With all that said, natural light can give you very beautiful photos when it hits the scene just right!
Below is an example of how much natural light changes. I took these photos 30 minutes apart on a very mild day, keeping everything consistent. You can see how much the photos differ in temperature and intensity.

Save This Recipe! 💌
Continuous
I switched from natural to continuous light when the days started getting shorter in the fall (of 2020). I do some of my shooting around mid-afternoon/evening, but the sun sets around 4pm here in the winter. Either I had to work around the sun's schedule or get artificial lighting.
I like continuous lighting because it can be used for photos as well as video.
Affordable Option
Switching to artificial can be intimidating but once you get used to it, it's super nice! If you're just starting out or want to give it a try before committing, I recommend purchasing a light with softbox on the cheaper end. I started with one from Phopik and was able to achieve great photos with it. You can buy a pair of lights for under $100 USD on Amazon. They're not the best quality, but they're a good place to start without spending a lot of money.
Quality Option
If you're ready to jump into a quality lighting setup, I recommend the Godox VL150, which is what I use. I also have a diffuser and C-stand for it, which is an additional ~$300. It's a big investment, but definitely worth it!
Software
- Adobe Lightroom Classic - this is what I use to edit my photos. There are other options out there (like Capture One Pro), but Lightroom is the industry standard and it has great organization! You can get it as part of Adobe's Photography Plan for just around $10/month!
- Backblaze - this software automatically backs up your hard drives into cloud storage so if your hard drives crash, you still have that extra backup.
My Photography Setup
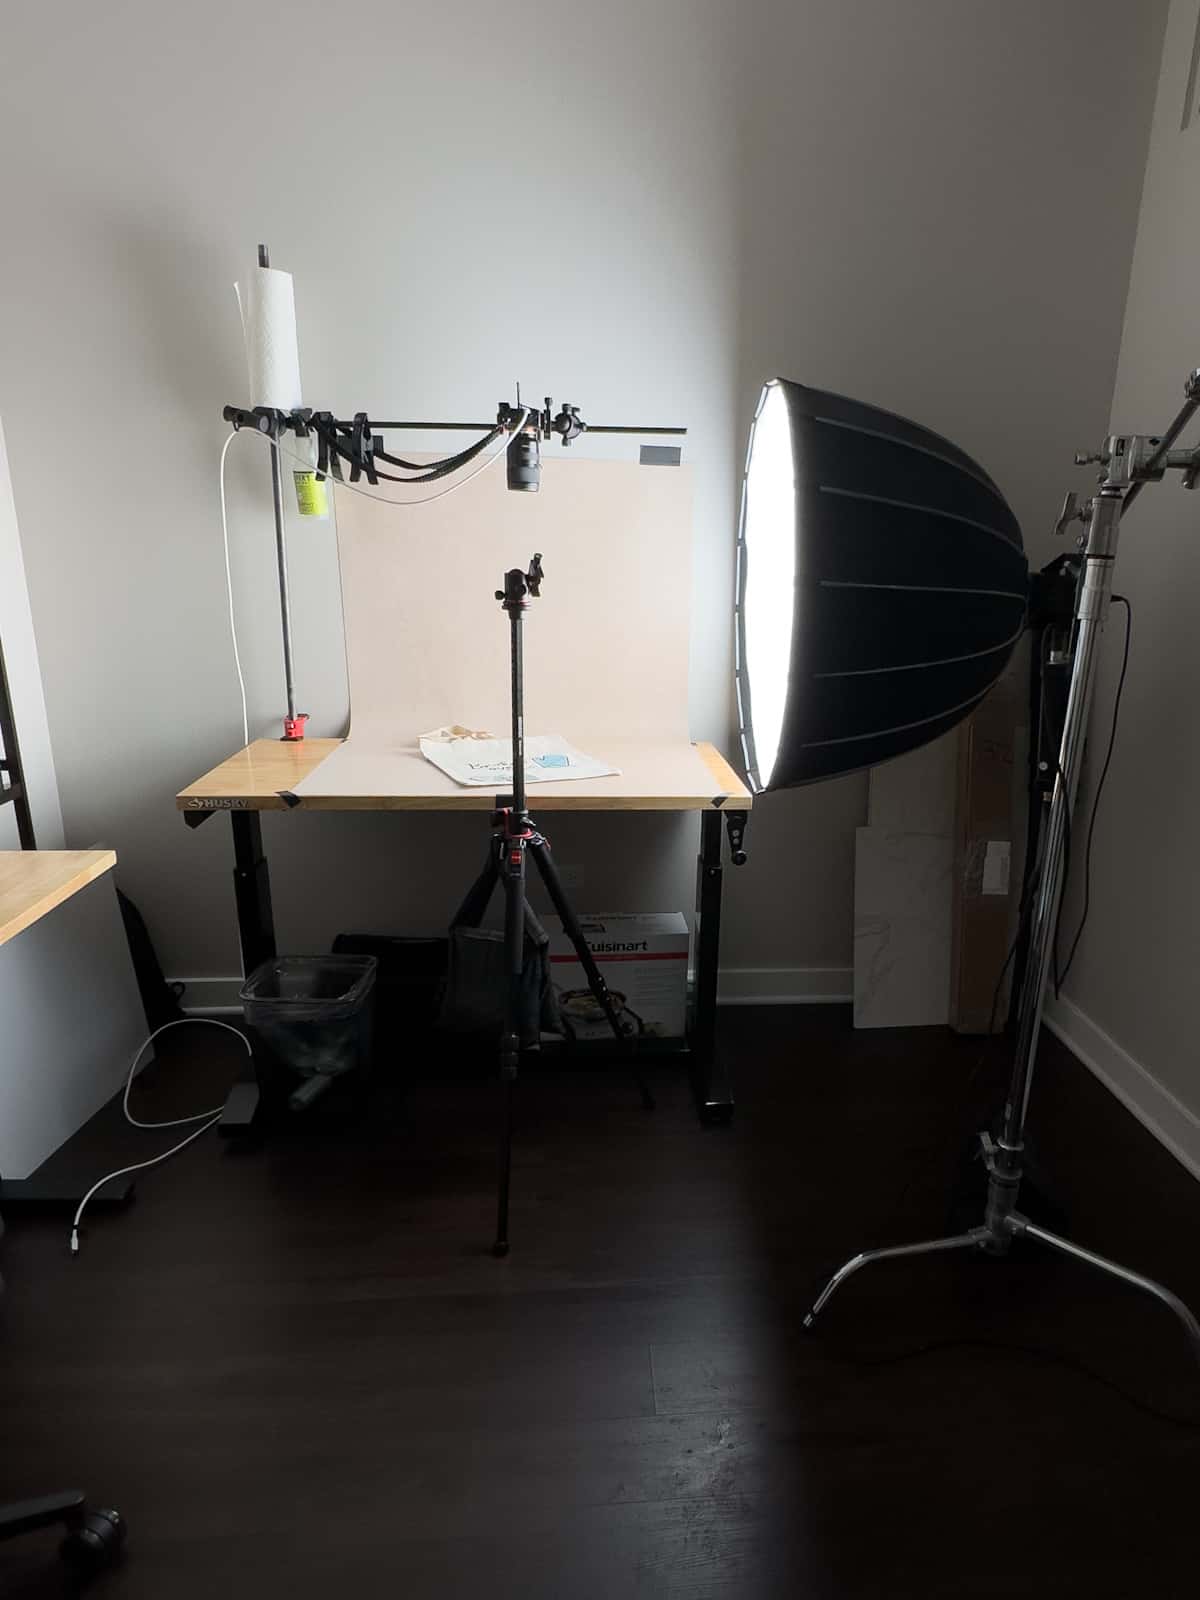
This is my food photography setup, inspired by Chris Pieta's DIY Backdrop Tutorial. I have my tripod on the ground for angled and straight-on shots, and then an extra tripod head attached to the c-stand arm for top-view shots. The only light source is the Godox VL150 as side lighting. Sometimes I'll place a reflector on the opposite side as well. It's a very simple setup that's great for small spaces!
Complete Gear and Software List
- First camera: Fujifilm X-T3 mirrorless camera
- Lens: 35mm lens
- Current camera:Sony a7 III
- Lens: Tamron 28-75 f/2.8 lens
- Memory Card
- Adapter
- UV filter
- Spare battery
- Tripod
- Sand bags
- External Hard Drive
- Tethering equipment/software
- Long USB-C to USB-C cable
- Imaging Edge Desktop (may vary depending on camera brand)
- Camera remote
- Camera strap
- Phopik Softboxes (cheap artificial light option)
- Godox VL150 (quality artificial light option)
- Softbox
- C-stand
- Adobe Lightroom Classic
- Backblaze
Questions?
If you have any specific questions or want further details on anything, don't hesitate to reach out! Feel free to message me on Instagram or shoot me an email.
If you're looking for 1-on-1 guidance with equipment and food photography, I'd be happy to help over a coaching call!
Comments
No Comments